How To Fix PS3 Not Reading Discs
This article will help you fix your Sony PS3, Read on!
It looks like you’ve come across this article as you frantically try to work out why your PS3 isn’t reading any discs anymore. If it is sporadically reading them at one time, then not at another, or generally not recognising a disc is in the drive, then unfortunately you have come across a problem which is become all to common with the PlayStation 3.
You need to replace your PS3’s Blu-Ray Drive Laser.
This is actually a pretty simple task, no aligning, no fiddling. A simple unscrew, replace, screw back together job.
As our first ‘How To’ we think this should give all the poor souls with broken PS3s a good chance at giving them a new lease of life and also help bust the cost of sending it to Sony or forking out for a whole new console!
Identifying the problem
You will need to replace the laser in your PS3 if:
Games and Blu-Rays load sometimes and not others
You watch Blu-Rays and the movie suddenly freezes
Your PS3 does not recognise a disc in the drive
Your PS3 will only allow you to watch DVDs
There are other symptoms of a faulty laser but generally if your disc slots in and ejects properly and it just doesn’t want to play a game or movie, then it’s the laser at fault and this guide, will do it’s best to help.
This guide will not help with crunching discs, PS3s not turning on, PS3s turning off, Yellow Light of Death etc.
What laser do I need?
This is quite easy to find out, there are only 3 different types of laser, a Single Eye for the early PS3s, a Double Eye for the newer ‘Fat’ PS3s and a more advanced Double Eye for the Slim PS3. As it seems the problems are occurring in the older machines, this guide is for a FAT PS3.
On the flat side of your PS3, right at the bottom, you will find a sticker which a model number such as “CECHC03” for example. There is a table/list of lasers at the very bottom of this page to check which laser you need.
The model with NEED TO CHECK was on the changeover between single lens and double, so a quick peek into the Blu-Ray drive of that system will let you know which one to order.
The model we have is a ‘CECHK’ therefore we used the KES-410A laser and is a good middle aged system to show in this How To guide. This is a genuine fix as we had a PS3 that started to not believe a disc was in the drive and when it did, would freeze whilst watching Blu-Ray movies.
So, The Fix Lets Get Started
You will need. A Torx T10 screwdriver, Large Phillips (Posi) Screwdriver and a Small Phillips (Posi) Screwdriver. If you don’t have a Torx T10 Screwdriver, then a really small flat head one may do the trick.

1.) We need to remove the shiny ‘PlayStation 3’ cover off the machine to expose the screws. To do this, you need to pull off the warranty sticker on the bottom of the PS3 and then pull out the rubber foot/mount to reveal a hole with the Torx screw. Unscrew that and slide off the cover.


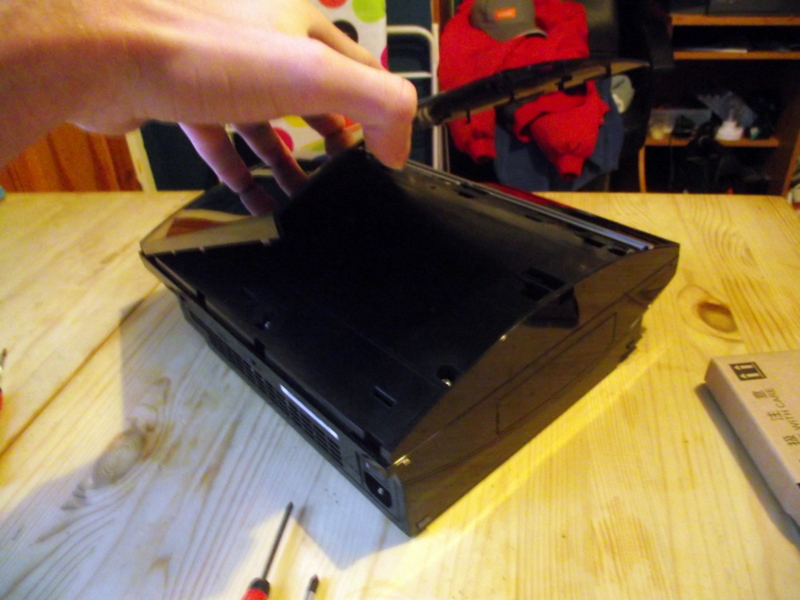
2.) To get into the ps3, there are now a number of screws to undo, these are all normal screws, note the size of them and where the smaller one(s) go, we found only one small one and the rest the same size, so no big deal. Once you have taken them all out, there is a small clip on the back side as shown in the picture here. Simply push it in and pull up the plastic cover. This now exposes some of the internal components!


3.) We now need to take out the Blu-Ray Drive to be able to work on it, so unplug the power connector as shown in the picture and lift up the drive to see underneath. You need to very carefully unclip the ribbon cable from the bottom of the drive, just put your finger under the black piece of the clip and flick up.


4.) Move all the PS3 pieces etc away so that you have a clear space to start working on the drive. With the drive, there are different models. The covering on the drive needs to be taken off. On our model we needed to take off the Matte Silver cover and the Shiny Silver cover. This is all done by unscrewing all the screws that go through the covers. There are only slight variations of the drive but basically, anything you unscrew, can go back together, so just take care and remember where the screws go.

5.) Once inside, you need to take the top part of the drive off, this is the part with the white plastic mechanisms that move to accept and eject the discs. In our model drive, there was a single screw and just clips around the outside. Gently pry it off and your in.
6.) So here we are, the business end of the PS3 Blu-Ray Drive. You’ll need to unclip the ribbon carefully then unscrew the black screws that have been circled in the picture. This means you can then remove the rails/sliders that the Laser is on and you can remove the laser.


7.) One last thing before you reassemble what will be your fixed PS3. There is a white plastic piece that is screwed onto the old laser, this is what rests against the spindle that turns and moves the laser up and down. Without that white piece attached, your laser won’t move so it won’t work. It’s only one screw.

8.) This is it, you’re now starting to put you PS3 back together. Attach the white piece to the new laser, put the new laser on the rails/sliders, screw it in and then begin to reassemble you PS3. Simply back track on what we have done and you’ll be able to get it back to one piece in no time.
9) Enjoy your now fixed PS3.
We hope this has helped, so please pass a link to this to your friends and also we’d love it if you could take the time to Stumble, Digg and Facebook the good work we’re doing.
|
PS3 Model # |
PS3 Release Date |
PS3 Type |
PS3 Hard drive |
Laser Lens Model |
Laser Deck Model |
|
CECHA |
8/2006 – 8/2007 |
Fat Model |
60GB |
KES-400A |
KEM-400AAA |
|
CECHB |
8/2006 – 4/2007 |
Fat Model |
20GB |
KES-400A |
KES-400AAA |
|
CECHC |
8/2006 – 8/2007 |
Fat Model |
60GB |
KES-400A |
KEM-400AAA |
|
CECHE |
08/2007 |
Fat Model |
80GB |
KES-400A |
KEM-400AAA |
|
CECHG |
10/2007 |
Fat Model |
40GB |
NEED TO CHECK |
NEED TO CHECK |
|
CECHH |
10/2007 |
Fat Model |
40GB |
KES-410A |
KEM-410ACA |
|
CECHJ |
08/2008 |
Fat Model |
40GB |
KES-410A |
KEM-410ACA |
|
CECHK |
08/2008 |
Fat Model |
80GB |
KES-410A |
KEM-410ACA |
|
CECHL |
08/2008 |
Fat Model |
80GB |
KES-410A |
KEM-410ACA |
|
CECHM |
08/2008 |
Fat Model |
80GB |
KES-410A |
KEM-410ACA |
|
CECHP |
10/2008 |
Fat Model |
160GB |
KES-410A |
KEM-410ACA |
|
CECHQ |
04/2009 |
Fat Model |
160GB |
KES-410A |
KEM-410ACA |
|
CECH-20 |
09/2009 |
Slim Model |
120GB/ 250GB |
KES-450A |
KEM-450AAA |
|
CECH-21 |
03/2010 |
Slim Model |
120GB/ 250GB |
KES-450A |
KEM-450AAA |
|
CECH-25 |
06/2010 |
Slim Model |
160GB/ 320GB |
KES-450A |
KEM-450AAA |


